Category Archives: Hair

Get Your Hair Summer Ready with John Frieda


cbias disclosure
#BeBeachBlonde #CollectiveBias
John Frieda Beach Blonde Collection at Target

We change our wardrobes as the seasons change. How about your hair? Do you change the way   it looks? The way you care for it?

It’s getting hot out there! Have you been ignoring your hair all winter? It’s time to get your locks summer ready with John Frieda! We have all been there, wanting those luscious beachy waves but a quick trip to the beach is just not an option. Luckily, John Frieda’s new Beach Blonde products have come to the rescue. Want to know the best part? These new products apply to women of all hair color- not just blondes!

To get the full affect of these beachy waves, we love starting the process with the Beach Blonde™Cool Dip™ Shampoo & Beach Blonde™Smooth Seas™ Conditioner because together they nourish and add texture prepping our hairstyle. To achieve our effortlessly undone and carefree beachy style, we finish up with the Beach Blonde™Sea Waves™ Sea Salt Spray. So all of you out there, who want to check out this new product line, just get yourself to Target and you will be looking like a beach babe in no time.

Is YOUR hair summer ready?


Hydrate Your Summer Hair with Design Essentials Natural

disclosure

a

As summer gets into full swing and the weather beings to warm, our hair starts bearing the full effects of all that sun. While we might enjoy spending some time in the sun, sometimes our hair just can’t stand the heat. For many of us, the summer heat means dry, dull hair that really needs some moisture!

To come to the rescue with some relief, Design Essentials Natural is helping to quench thirsty hair with their new, all-natural Coconut & Monoi Deep Moisture Collection. Each product in the collection has a formula that is expertly designed to deliver maximum hydration to the hair using nourishing botanicals and the oils of Coconut & Monoi, a fun and tropical combination perfect for the summer season!

The Coconut & Monoi Deep Moisture Milk Creme utilizes a nourishing blend of Argan, Olive, and Sunflower oils to deliver intense hydration to your hair. It’s great for finishing styles to minimize frizz and flyaways, and is suitable for all hair textures. Coconut & Monoi Coconut Water Curl Refresher revitalizes curls with our triple hydrating Monoi Moisture Blend. With daily use, minimize your frizz and extend the life of your styles without shampooing. The Design Essentials Deep Moisture Milk Souffle with Sunflower & Shea is a nourishing styler for lightweight, frizz-free hair. It can be used on wet or dry hair, and is ideal for all hair textures! Coconut & Monoi Deep Moisture Oil Treatment with with Argan & Sunflower Oil is infused with nourishing botanicals and revitalizing antioxidants to instantly start the repair process for damaged hair. Renew strength and elasticity while shielding the hair from the damaging elements! The Coconut & Monoi Intense Shine Oil Mist instantly soothes dry, brittle hair to leave each strand perfectly nourished and conditioned with a luminous shine! Its hydrating and strengthening properties even help to mend split ends!

Design Essentials Natural

 My curly hair has loved starting out the summer using a combination of the Coconut & Monoi Deep Moisture Milk Creme and the Coconut & Monoi Coconut Water Curl Refresher to revive my summer waves and curls. The Coconut & Monoi Intense Shine Oil Mist also gives my hair a nice finishing touch. Plus, I cannot fail to mention the AMAZING smell. It has a nice, light coconut smell. I look forward to that smell every morning now!

Design Essentials Natural recommends combining these products to shield your hair from the heat and keep it hydrated this summer!  For more information on Design Essentials and their entire line of products, please visit www.designessentials.com.

Do summer extremes dry out YOUR hair?

How to Create a Side Chignon – The French Bun Hair Tutorial

disclosure affiliate linksOtherwise known as a French bun, a chignon traditionally sits at the nape of the neck. In its loose, messy form it’s great for hiding bad hair days. In its smooth, polished form it’s perfect for a night of theater and fine dining.

Here’s our simple step-by-step tutorial for this versatile style–from the professionals on the Color Crew at Madison Reed!

Side Chignon Tutorial

1. Create a deep side-part, as clean or messy as you like.

2. Gather all hair behind opposite ear from part. Smooth with your favorite brush if desired, or leave messy.

3. Secure into a ponytail with a hair-tie.

4. Separate ponytail into three sections. Take bottom-most section and start twisting.

5. While twisting section, curl around base of ponytail. Secure to base of ponytail with pin.

6. Repeat with two remaining sections twisting into complimentary curls.

7. Pin the two remaining sections into place as you go.

8. Once a completed curled Chignon has been pinned into place, pull out small sections for a romantic feel, or smooth and perfect with a tail comb for a modern, clean result. Spray to hold.

Now get the color you need for your hair! Madison Reed offers easy-to-apply hair color delivered to your door on YOUR schedule.

Which Celebrity Hairstyle Are You? Win the Look Reader Giveaway!

Which Celebrity Hairstyle Are You Win the Look!

Do you have a celebrity hair style that you totally love, but need a little help to achieve? Take this “Which Celebrity Hairstyle Are You?” mini-quiz and enter for a chance to win a matching extension piece from Hair2Wear and HairUWear to recreate their look!

Christie Brinkley – Length, Volume, And Waves

Screen Shot 2015-02-15 at 8.29.15 PM

No need to be a supermodel to get this look! Hair2Wear Christie Brinkley 16” Extensions can help you achieve her long and elegant hairstyle with minimal effort. For longer, fuller, more beautiful hair, this one-piece hair extension clips in so easily. Its loose wave texture is designed to blend naturally with your own hair to provide maximum volume. ($49, www.sallybeauty.com)

Kim Kardashian – Sleek, Chic, Pulled Back Pony

Screen Shot 2015-02-15 at 8.30.06 PM

This sophisticated look can be achieved in seconds with Hairdo by HairUWear 18” Simply Straight Pony! This attach-in-an-instant piece lets you add long, full, trend-setting pony style to any look. ($49; www.ulta.com)

Emma Stone – Classic and Elegant Bangs

Screen Shot 2015-02-15 at 8.32.01 PM

Attach this accessory in a snap! Classic, and elegant the Hairdo by HairUWear Clip-In Bang is a 5″ long blunt cut bang with framing sides that gives any woman bangs without the commitment of cutting her hair! Available in 11 salon inspired colors to best match your hair! ($29; www.ulta.com)

*Note: These celebs did not necessarily wear HairUWear products, but we wanted to show you how your readers’ can get the look by using them

Reader Giveaway: One lucky Jinxy Beauty reader will win an extension piece from Hair2Wear and HairUWear. To enter, just complete the entry form below by 11:59pm ET on 3/3/15. Good luck!

a Rafflecopter giveaway

TUTORIAL: Get Chrissy Teigen’s Grammys Hair + Macadamia Professional Giveaway

Chrissy Teigen Grammys 2015

On the arm of her Grammy-nominated artist husband John Legend, Chrissy Teigen took to the 57th Annual Grammys Red Carpet last night in heavenly white Versace and her hair in Angelic Beach Waves to match. Want to know how to recreate that look? Luckily for us, the creator of her style, Celebrity Hairstylist and Macadamia Professional International Creative Director Giannandrea, shared his “how to” for achieving this sultry silhouette.

  1. Start with wet hair and apply Macadamia Professional Foaming Volumizer($25) to crown only.
  2. Apply Macadamia Professional Blow Dry Lotion($24) through the entire length of the hair.
  3. Blow dry large sections with a large round brush to increase volume all over, especially on the top layers. Part hair down the middle.
  4. Starting slightly below the crown, wrap small sections around a ¾-inch curling iron.
  5. Use a flat iron to gently flatten the waves, making sure to keep the waves and not to remove the roundness.
  6. Flatten the ends for an edgy finish. Spray each section with Macadamia Control Working Spray($23) to hold and set the waves.
  7. Using hands, run Macadamia Professional Nourishing Moisture Oil Spray($31.95) throughout the length to increase shine and supple texture.

Macadamia Professional

Reader Giveaway: One lucky Jinxy Beauty reader will win Macadamia Professionals Control Working Spray. To enter, just complete the entry form below by 11:59pm ET on 2/24/15. Good luck!

a Rafflecopter giveaway

Better Home Hair Color Tips

Disclosure Affiliate

Better Color

Do you color your hair at home? If you have been nervous to color your own hair – it’s so easy!! While I do usually like the results of salon coloring, it involves so much time and expense that I appreciate the convenience and the savings of doing it at home. The more you understand it, the more control you’ll have over the results. Our friends at Madison Reed have five easy tips to get and keep better hair color.

1. Just the Roots

Permanent hair color works by opening your hair cuticle, lifting out the current color, and depositing a new one. If you repeat this process over and over on the same hair, it will begin to lose protein and become more porous. This affects how your hair color applications turn out: porous hair will take on a lot of color easily, but not hold on to it well. If your hair gets really dark when you first color and then fades very quickly, you have porous hair.

The best way to prevent this is by only coloring your roots, the new hair growth, after your initial application of a new color or shade. That way, you will avoid reprocessing hair that has already been colored. Wait until you can see a clear band of outgrowth for a more accurate application, about every 3-4 weeks. Overlapping when touching up can cause variations in color. If you’re worried about your roots showing between applications, use Root Touch Up to get great color coverage that lasts from shampoo to shampoo.

To refresh color on your lengths and ends, pull permanent color through your hair every fourth or fifth coloring session. Or you can refresh with semi-permanent color, which corrects tone and acts as a long-lasting stain on hair that has already been opened.

2. Gloss it Up

Semi-permanent color, also known as hair gloss, is a beautiful hair multi-tasker! You can also use clear gloss to deep condition and add light-reflecting shine, or tinted shades to brighten faded color and add shine, tone and dimension. Check out all the new Color Reviving Gloss from Madison Reed – available in 8 great shades.

3. Use it or Lose It

I know what you’re thinking: will I have to throw away all that extra hair color if I only color my roots? This is very important: only mix the developer and color that you are using immediately. Do not keep any color that has been mixed with developer.

When they are mixed together, it sets off a chemical reaction. Mixed color will not be effective, and it can also be dangerous to store.

Now for the good news. Unmixed, both developer and color have a longer shelf life: 3 years unopened and 6 months after package has been opened. Just be sure to keep them separate until you’re ready to use them!

4. Cut the Harsh Chemicals

A healthier formula makes all the difference when frequently coloring your hair. Harsh chemicals damage hair, making it stripped, dry, brittle, and dull. Color that is free of ammonia, resorcinol, and PPD is much easier on the scalp and hair shaft. That’s why the Madison Reed Radiant Color Kit is free of those harmful ingredients and packed with nourishing elements that repair and strengthen hair, leaving it soft, shiny, and bouncy.

5. Protect Your Color

Picture your hair color as physical pigments that need help to stay in your hair. Madison Reed’s nourishing color enhancing Shampoo and Conditioner Set is designed to extend the life of hair color by being more gentle and healthier for your hair. This enables the color pigments to stay longer because they’re not being stripped out of your hair. Over time, using haircare that repairs and protects your hair also helps it become less porous (remember my explanation at the top?). All of these things work together to help your hair look and feel better the more you use healthier products!

Find your perfect hair color now with Madison Reed.

Tips for Curly Hair – Love those Curly Tresses!

Tips for Curly Hair
Curly hair can be lots of fun and very beautiful! With the help of these easy tips from Tamika Claridy, Manager & Senior Stylist at Symbols Salonm curly girls can embrace their tresses and maximize their natural beauty!

1. By nature, curly hair bestows a very porous texture so it requires lots of moisture. Claridy recommends cleansing with a hydrating or moisturizing shampoo and conditioner. It’s best to shampoo on alternating days or even every two days as shampooing every day can cause dry hair and scalp.

2. Use a leave in conditioner and make sure the hair gets fully saturated. This will keep the hair conditioned, soft and moisturized.

3. Use a dime sized dab of product for especially created for curly hair such as curl creams or balms. Claridy recommends creams and balms because they won’t dry the hair out and they leave the hair soft and natural looking.

Bonus tips: Always use a shampoo formulated for curly hair. Claridy does not recommend using hair gel or mousse because it can cause the hair too be dry.

image003

Located in Downton Miami, Symbols Beauty Salon is a 2,500 square foot full service salon and day spa that provides a harmonized and creative and inviting environment for all things beauty and head to toe pampering. Taking a cue from European Salons, Symbols merges the glamourous worlds of beauty fashion and style for a one stop shop beauty concept. The sleek, state of the art salon is equipped with the most innovative beauty technology for the ultimate in luxe pampering including touches such as shampoo chairs that provide massage and soothing light therapy to reduce stress and calm the mind.

Braid Tutorials – Learn How to Make a Plethora of Plaits!

Braid Tutorials

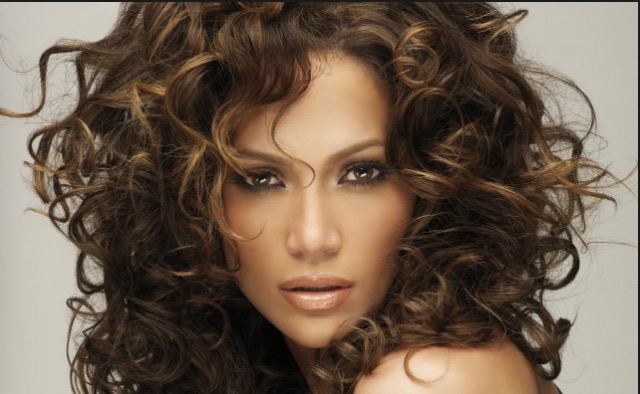
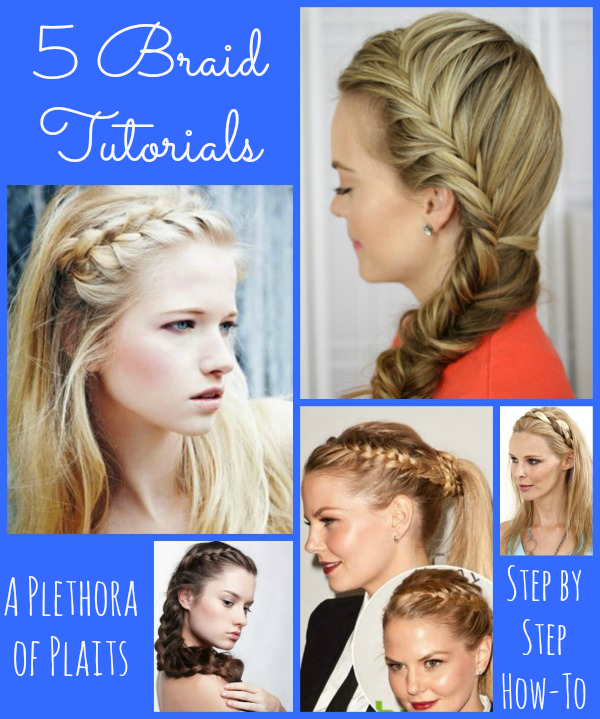
Braids are all the rage and Miami based Master Stylist Raphael Reboh, owner of Femme Coiffure Salon, is providing us with the simple steps necessary to add a spin to your everyday hair styling with a plethora of plaits. Reboh has styled a-list tresses including Jennifer Aniston, Jennifer Lopez, Cameron Diaz, Joan Collins, Adriana Lima, Bianca Jagger and even the late Joan Rivers.

Fishtail French Braid

Fishtail French Braid –
This look is also called the new Dutch Braid and it’s a fresh departure from the traditional French Braid. This style is easy to do and great on both thick and thin hair. Naturally, you just need length to for this style.

1. Start by taking a section of the hair near the part on the heavy side
2. Divide that into two halves
3. Now take a small piece from the edge of the right side, cross it over the top and add it to the left side.
4. Do the same from the left side, crossing it over the top and addition it to the right side.
5. Now repeat step three but after crossing the strand over the top, add in a section of hair from that side of the head.
6. Repeat these steps until you reach the top of the ear then begin pulling in hair from the opposite side of the head, stretching it around the back, and adding it into the braid.
7. When all the hair is pulled in, finish with a basic fishtail braid and gently loosen the braid by pulling out the edges. 8. Tie off the end with a clear plastic band and add a pretty hair clip to finish it off.
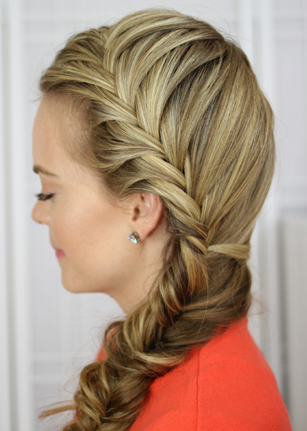
Side French Braid

Side French Braid –
1. Part slightly damp hair on the right side. Optional: add a little mousse or gel to keep hair intact and to prevent fly-aways. Next, take about a two-inch chunk of hair from the front of the right hairline, and begin a French braid
2. To start a French braid, section this portion of hair into three even strands, keeping them separated with your fingers (whichever ones feel most comfortable to you). Now, start a normal braid; take the right strand and cross it over the middle strand. Next, take the left strand and cross it over the middle strand.
3. Once you have this small foundation braid, begin adding more hair with each crossover. To do this, gather a small bit of hair from the hairline, add it to the rightmost strand, and then cross it over the middle strand. Pull it tight, but keep the strands separated at all times. Repeat on the other side by gathering a small bit of hair closest to the side part (away from the hairline), adding it to the leftmost strand, and then crossing it over the middle strand.
4. Continue this braiding pattern until you are about one inch away from the right neckline. At this point, start to braid horizontally across to the left neckline. Tip: keeping the braid tight and separating the three sections of hair at all times will help you control the direction of the braid.
5. Try to gather all the hair into the French braid by the time you hit the bottom of the left ear. Once all the hair is incorporated, finish braiding traditionally. Secure with an elastic band.
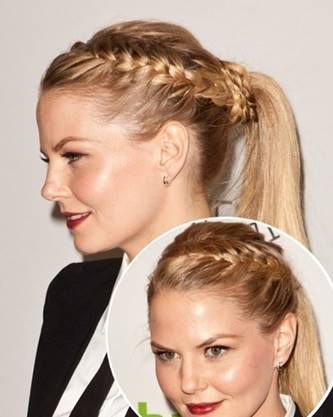
Half French Braid Wrapped Ponytail

Half French Braid Wrapped Ponytail

1. Begin by parting the hair off center on the right. Part further back on the top of the head.
2. Part it down to the ear and secure all the rest of the hair hanging down in the back for now.
3. At the top on the left side of your part, start plaiting a braid.
4. Once you’ve plaited one round of the braid, grab some hair from the top & add it in, like you’re French braiding.
5. Only add hair in from the top as you’re plaiting the braid.
6. Once you run out of hair to add & have reached that back part …
7. Stop adding hair but continue doing a regular braid down to the end of the hair. Secure temporarily with a clip.
8. Flip that braid up out of the way and smooth all remaining hair around to the left side of the head.
9. Make a low side ponytail and flip your braid back down.
10. Wrap the braid under your ponytail and bring it back around the top. *If you wrap it over the top it tends to make your French braided part pucker so I have more luck putting it under the ponytail.*
11. Loop the end of your braid back around and under itself so it’s close to the head. I’ve done it the other way too, but this is the way I did it when I documented it all!
12. Wrap it as much as want, but I just do 1 full wrap at the base of the ponytail. Secure the braid to the ponytail with a clear rubber band.
13. Cinch the rubber band up and it’ll disappear under the braid.
14. Unbraid any leftover braid that is hanging down into the ponytail below that clear rubber band.
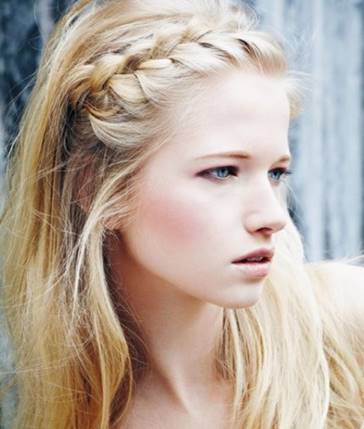
Headband Braid

Headband Braids –
Headbands and braids are two hair trends that never go out of style. This boho chic hairstyle is great because it will keep hair out of your face and doesn’t give you that horrible headband headache. Begin by making two parts, one of each side of the head near the ear. Comb the remaining hair backwards into a ponytail. Then take the right side of the hair and braid, lifting it around the head. Wrap a hair elastic at the bottom of the right braid and repeat on the left. Lift both braids and wrap them around your head, positioning them toward the front. Secure both braids along the bottom of the head with a bobby pin. Release the hair in the back. This look is versatile enough to go from everyday errands to a glam night out.

Loose Headband Braid

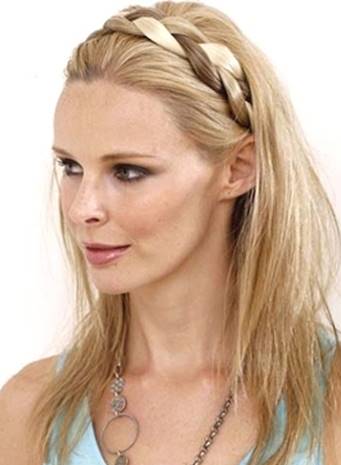
Loose Headband Braid –
Braided headbands continue to be one of the most stylish ways to hide the effects of humidity, frizz and winter hat head all year long.
Start by taking a 2-inch wide section of hair from right behind of your right ear. Tie the rest of your hair back with a hair tie in order to keep it out of the way – we’ll come back to this part later!
Comb the 2-inch section of hair towards the left ear, over the top of your head so that it’s primed to go in the direction you will be braiding. If needed, use a blow dryer or hair spray to help pull hair in the right direction.
Divide the 2-iinch section into 3 pieces and begin braiding a simple braid, going over your head to form a headband. Aim for the headband to rest between 1 and 1.5 inches back from your hairline. Having it loose or tight is your choice. When you reach the end of your braid, secure the braided section behind the left ear with either just a hair pin or both a hair elastic and hair pin.
For a more polished look, use booby pins to tuck-in loose hair around the braid. For a boho vibe, keep the loose pieces as is. Spray the braided headband with hair spray before untying the non-braided portion of your hair and styling as desired.

About Raphael Reboh, Femme Coiffure
Raphael Reboh, Owner of Femme Coiffure in Miami Beach moved from Paris, France to Montreal Canada with his siblings to open their first salon. All of the brothers had a special knack for hairstyling. About 20 years ago, Reboh saw an opportunity to open a salon in prestigious Bal Harbor, Fl and later Miami beach. Years of talented styling have granted to the hair expert an A-list clientele with stars including Jennifer Aniston and Cameron Diaz. Femme Coiffure boasts a modern interior design approach with a monochromatic white color scheme and hints of baby blue furnishings. Femme Coiffure offers a range of services including cuts, blow-outs, color and special offerings like Brazilian Blowout Smoothing Treatments. For more information about Raphael Reboh and Femme Coiffure, please visit www.femmecoiffure.com

Recreate AMA Hairstyles of Julianne Hough and Rita Ora

Recreate AMA Hairstyles of Julianne Hough and Rita Ora

As usual, the fashions and hairstyles at the American Music Awards go hand in hand with the music for top-billing for the evening. There were some gorgeous dresses on hand and equally beautiful hairstyles. I personally loved Julianne Hough’s slick and simple do. To help you Recreate AMA Hairstyles at home, Jenny Balding, Cutler/Redken Stylist, shares two of her favorite looks from tonight’s 42nd Annual AMAs – Rita Ora & Julianne Hough and how to achieve the look for yourself.

To recreate Julianne’s slicked back bob:

  • Start by blow-drying all your hair back and off your face.
  • Create a deep side part of whatever side that suits you best.
  • Starting at the back use a gel that has hold and creates shine for best results.
  • Take small sections at a time and apply the gel and comb through each section.  Continue until you reach the front hairline a sweep back off your face also.
  • It’s important to start at the back to make sure every strand is coated with gel to create the ultimate sleek style.


To recreate Rita Ora’s ultimate sleek topknot:

  • Start by blow drying your hairline up and back to really help getting it smooth and sleek
  • Use a sleek balm through the roots to tame and smooth the flyway’s.  Cutler flyaway stick is the perfect product for this as the more you use the more it will hold and create sheen.
  • Sweep into a really high ponytail that sits right on top of the crown.
  • Use a straightening iron on the ponytail to create a super sleek finish.
  • Mist each section first with a strong hold hairspray that won’t flake and delivers shine also. Redken Control Addict 28 is perfect for this
  • Wrap around the base of the ponytail, section by section until the last section of hair leave about 2″ of hair out to create Rita’s topknot.
  • Finish by misting Redken Diamond Oil High Shine Airy mist to achieve exceptional shine.

5 Hair Tricks to Make You Look Years Younger this Holiday Season

disclosure affiliate links

5 Hair Tricks to Make You Look Years Younger

As the holidays approach, you can get ready to roll back the calendar with 5 Hair Tricks to Make You Look Years Younger this Holiday Season from Madison Reed.

Turn back the clock with a bang!

It’s amazing how bangs can softly cover and ease those worry creases in your forehead and somehow harken to a childlike look. Bangs can be layered, side swept, choppy or straight. A beautiful bang can be better than Botox!

Reverse gravity with an updo!

Going vertical offers an instant facelift! A romantic updo can work against the horizontal lines in the face that come with age like crow’s feet and nasolabial folds or laugh lines. It also brings the focus up to your eyes where all of the sparkle and magic happens.

Adorn yourself!

Decorate your hair for the upcoming celebrations! A hair ornament or two make you look fresh, and festive. There is something about adding jewels that brings out our inner princess.

Cover up those roots!

Root Touch Up

Ran out of time for a full hair coloring before the next holiday party? Don’t let that be your excuse for letting your roots run wild. Look your brightest and shiniest with a quick blending of the perfect color on your hairline. Madison Reed’s Root Touch Up comes in a full spectrum of colors to conceal roots and grays on the go.

Pump up your color!

Why settle for the same old, drab color? Even if you are not covering grays, roll back the years by adding tones in your hair that compliment your skin tone and eyes. This makes a profound difference in the way that you look. Think of how you look in a color that does not compliment your skin tone versus a color that lights you up! Imagine your crowning glory creating that effect every day!

For cool complexions on brunettes, consider mahogany, deep reds and chocolates and for cool blondes, go for minky, smoky tones. For warm complexions on brunettes, add cinnamon and gold tones and for warm blondes, wheat and honey tones. Brightening and refreshing your color will literally turn back the clock!

Find your perfect hair color now with Madison Reed!